The Art of the Embroidered Christmas Tree: A Detailed Guide to Design and Technique
Related Articles: The Art of the Embroidered Christmas Tree: A Detailed Guide to Design and Technique
Introduction
In this auspicious occasion, we are delighted to delve into the intriguing topic related to The Art of the Embroidered Christmas Tree: A Detailed Guide to Design and Technique. Let’s weave interesting information and offer fresh perspectives to the readers.
Table of Content
- 1 Related Articles: The Art of the Embroidered Christmas Tree: A Detailed Guide to Design and Technique
- 2 Introduction
- 3 The Art of the Embroidered Christmas Tree: A Detailed Guide to Design and Technique
- 3.1 The Design Process: Embracing Creativity and Personalization
- 3.2 Essential Embroidery Techniques for a Festive Tree
- 3.3 Beyond the Basics: Exploring Advanced Techniques
- 3.4 FAQs: Addressing Common Questions
- 3.5 Tips for Success: Mastering the Craft
- 3.6 Conclusion: Embracing the Joy of Handcrafted Tradition
- 4 Closure
The Art of the Embroidered Christmas Tree: A Detailed Guide to Design and Technique

The Christmas tree, a symbol of the festive season, evokes feelings of joy, warmth, and togetherness. Its iconic silhouette, adorned with twinkling lights and colorful ornaments, has inspired countless artistic interpretations. Among these, embroidery offers a unique and timeless medium to capture the essence of the Christmas tree, transforming it into a cherished handcrafted treasure.
This article delves into the intricacies of creating an embroidered Christmas tree, exploring the design process, essential techniques, and the myriad possibilities this art form offers.
The Design Process: Embracing Creativity and Personalization
Designing an embroidered Christmas tree is an opportunity to express individual creativity and personal style. The process begins with choosing the desired aesthetic and considering the overall theme of the embroidery.
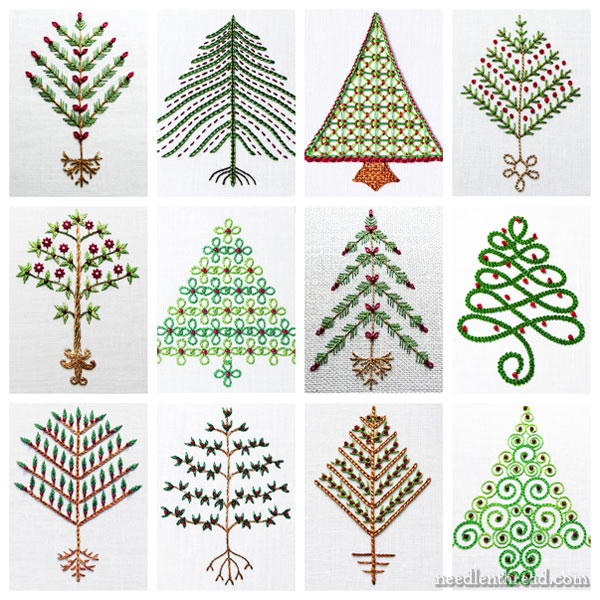
1. Choosing a Silhouette:
- Classic Triangle: This traditional shape provides a simple and elegant starting point, allowing for various embellishments.
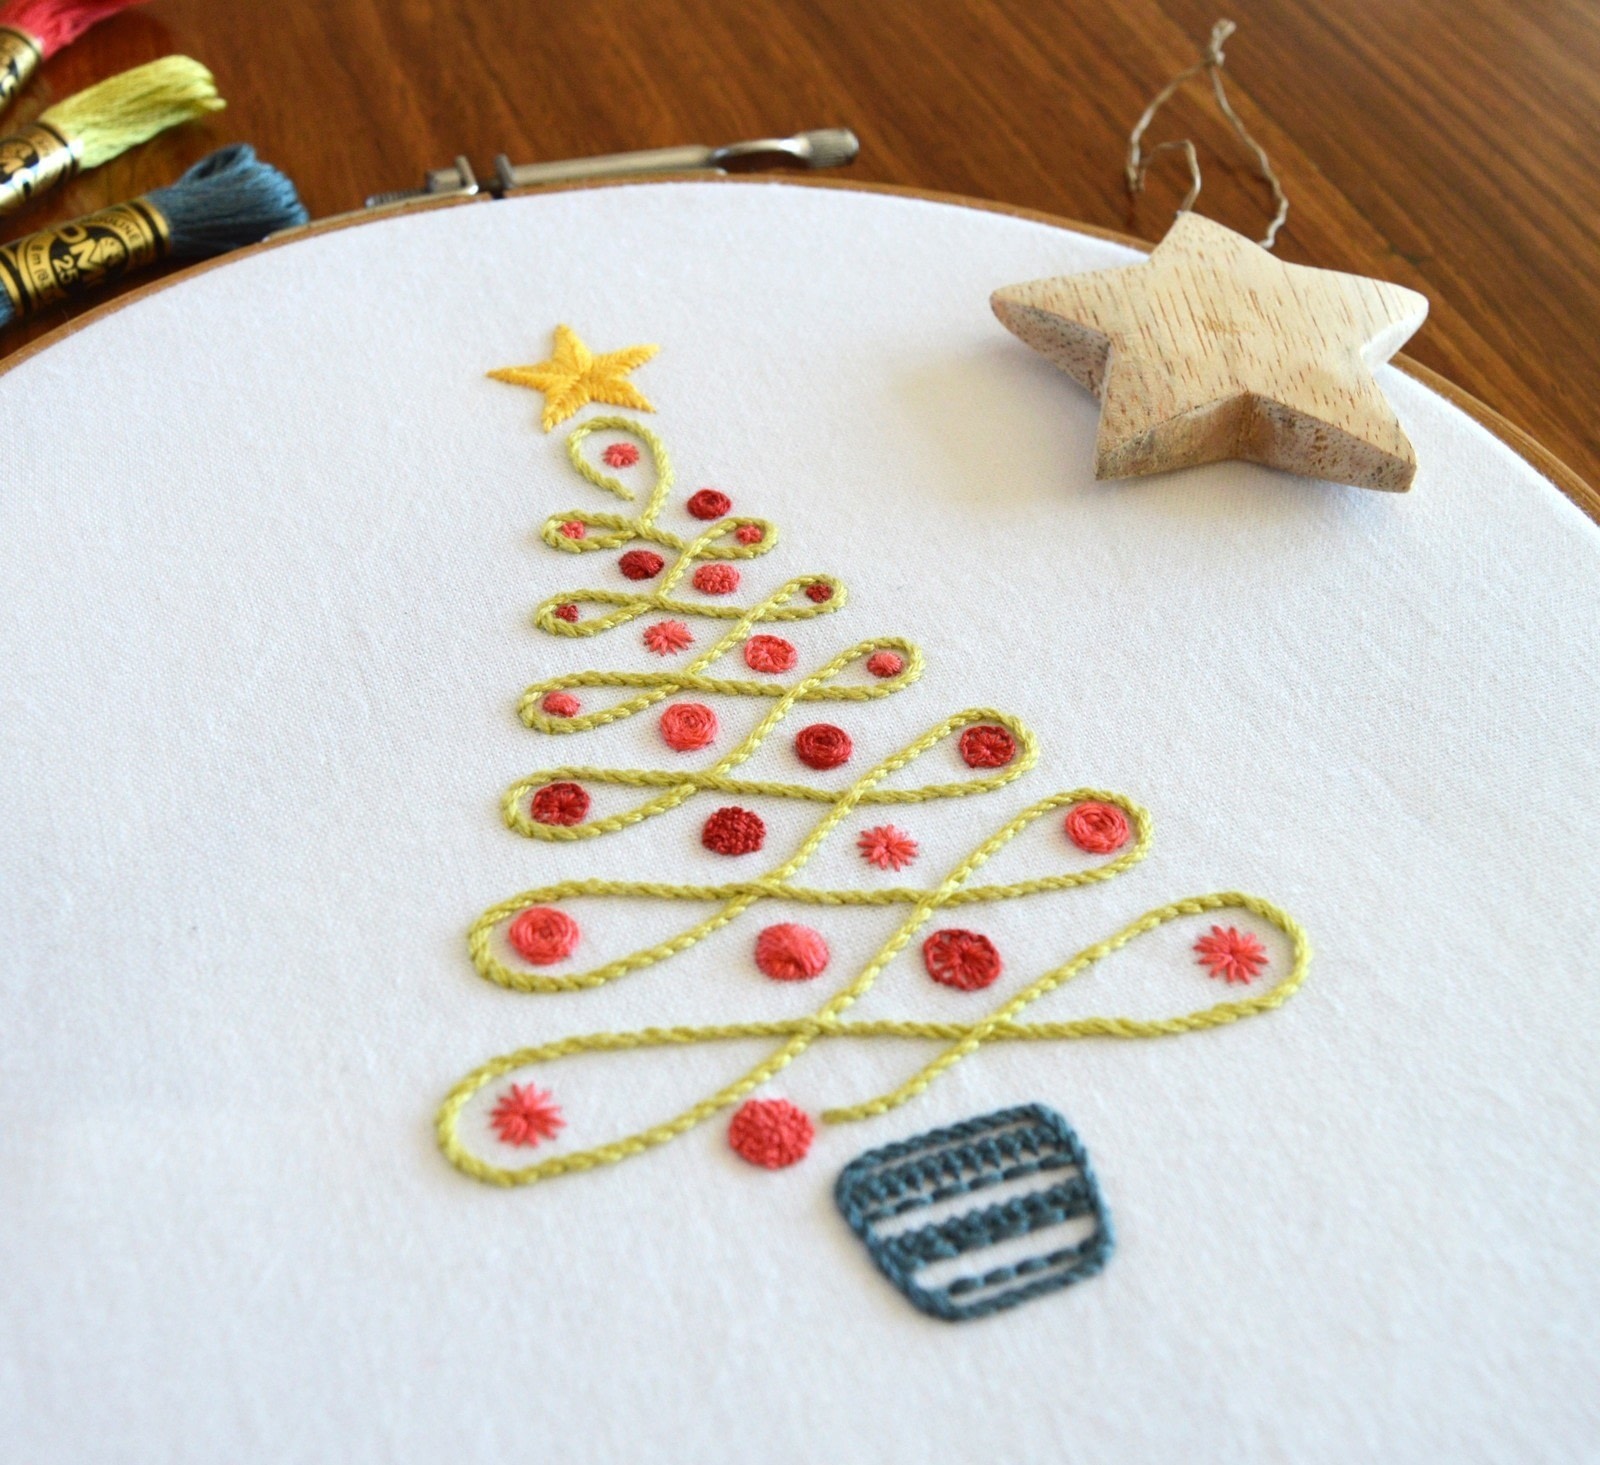
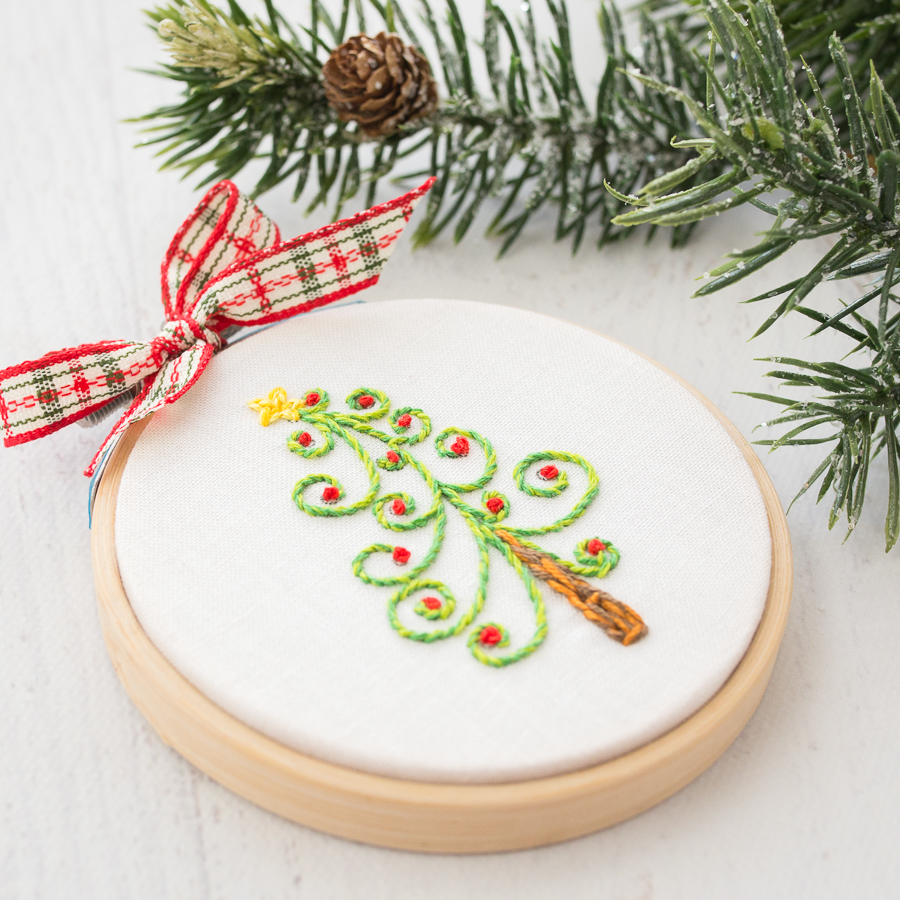
- Curvy and Whimsical: A more playful approach can be achieved with rounded edges and flowing lines, creating a whimsical feel.
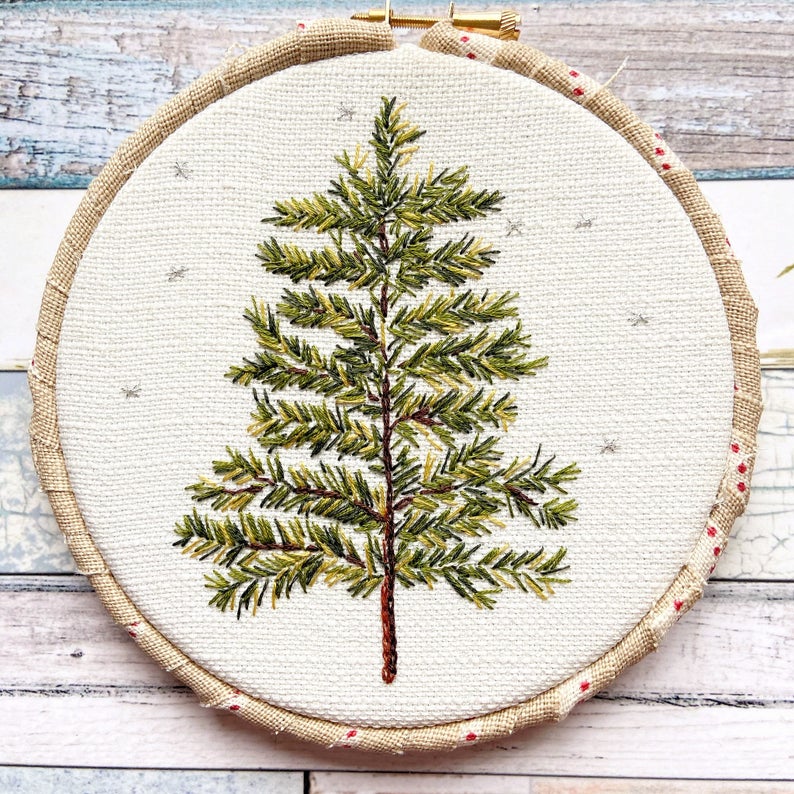
- Realistic Depiction: For a detailed representation, one can choose to incorporate branches, trunk, and even a base for added realism.
2. Selecting the Color Palette:
- Traditional Reds and Greens: These classic hues evoke the spirit of Christmas and create a timeless aesthetic.
- Metallic Accents: Silver and gold thread add a touch of elegance and sparkle, enhancing the festive ambiance.
- Modern and Minimalist: Subtle color combinations like white, grey, and blue offer a contemporary and sophisticated look.
3. Embellishing the Tree:
- Ornaments: The iconic Christmas ornaments can be represented with various embroidery stitches, adding texture and detail.
- Garlands and Ribbons: These decorative elements can be incorporated with satin stitch or French knots, adding a touch of sophistication.
- Stars and Lights: Embroidered stars atop the tree or twinkling lights woven into the branches create a magical ambiance.
4. Considering the Background:
- Solid Colors: A simple background allows the embroidered tree to stand out, creating a visually striking piece.
- Detailed Landscapes: A snowy landscape, a cozy fireplace, or a wintery scene can be incorporated to create a more immersive experience.
- Textural Elements: Using fabrics with different textures or incorporating elements like felt or beads can add depth and richness to the background.
Essential Embroidery Techniques for a Festive Tree
The beauty of embroidery lies in its versatility. Various stitches can be combined to create a captivating and detailed Christmas tree.
1. Backstitch: This stitch forms the foundation of the tree’s outline, creating clean and defined lines. It is ideal for capturing the tree’s shape and adding a classic feel.
2. Satin Stitch: This stitch fills in areas with a smooth, even surface, perfect for creating ornaments, garlands, or the tree’s trunk. It adds a touch of elegance and sophistication.
3. French Knots: These tiny knots are ideal for adding sparkle and detail, representing ornaments or twinkling lights on the tree. They add a touch of whimsy and texture.
4. Running Stitch: This simple stitch can be used to create delicate branches or the outline of ornaments, adding a subtle and graceful touch.
5. Blanket Stitch: This stitch is ideal for creating a border around the tree, adding a finished look and highlighting the design. It can also be used to create a festive garland around the tree’s base.
6. Chain Stitch: This stitch adds a decorative element, creating a flowing effect for garlands or the branches of the tree.
7. Stem Stitch: This stitch can be used to add detail to the tree’s trunk, creating a realistic and textured effect.
8. Cross Stitch: This stitch, often used for creating intricate patterns, can be incorporated to represent ornaments or create a unique texture on the tree’s surface.
Beyond the Basics: Exploring Advanced Techniques
For those seeking to elevate their embroidered Christmas tree, advanced techniques can add depth and complexity.
1. Free Motion Embroidery: This technique allows for free-flowing designs, creating a more organic and expressive look. It can be used to depict branches, garlands, or even the falling snow surrounding the tree.
2. Needle Felting: This technique involves using a needle to create texture and dimension by adding wool fibers to the embroidery. It can be used to create realistic ornaments, fluffy snow, or even a detailed tree trunk.
3. Bead Embroidery: Adding beads to the embroidery can create a shimmering and eye-catching effect. Beads can represent ornaments, stars, or even the twinkling lights on the tree.
4. Applique: This technique involves attaching fabric shapes to the background, creating a layered and textured effect. It can be used to create ornaments, garlands, or even a charming little house at the base of the tree.
5. Embroidered Landscapes: For a more immersive design, consider incorporating a detailed landscape around the tree. Snowy hills, a cozy cabin, or even a starry night sky can add depth and meaning to the piece.
FAQs: Addressing Common Questions
1. What type of fabric is best for embroidering a Christmas tree?
- Linen and Aida cloth are popular choices due to their even weave, making them ideal for creating crisp lines and intricate details.
- Felt and wool felt offer a soft and textured surface, perfect for adding dimension and creating a cozy feel.
2. What type of thread is best for embroidering a Christmas tree?
- Embroidery floss is a versatile choice, offering a wide range of colors and a smooth texture for creating intricate details.
- Metallic threads add a touch of sparkle and elegance, perfect for representing ornaments or twinkling lights.
3. How can I ensure my embroidered Christmas tree is symmetrical?
- Use a lightbox or a window to trace the design onto the fabric, ensuring accuracy and symmetry.
- Divide the tree into sections and work on each section individually, ensuring that the stitches are consistent and balanced.
4. What are some tips for creating a realistic-looking Christmas tree?
- Use a variety of stitches to create texture and dimension, representing the different branches and layers of the tree.
- Incorporate shading by using different shades of green or brown thread, creating a sense of depth and realism.
5. How can I display my finished embroidered Christmas tree?
- Frame the embroidery with a simple mat and a decorative frame, creating a gallery-worthy piece.
- Mount the embroidery on a piece of cardboard or canvas, adding a festive touch to your home decor.
- Use the embroidery as a unique ornament, adding a personal touch to your Christmas tree.
Tips for Success: Mastering the Craft
1. Start with a Simple Design: Begin with a basic Christmas tree silhouette and gradually work your way up to more complex designs.
2. Practice Your Stitches: Mastering the basic embroidery stitches is crucial for creating a beautiful and detailed piece.
3. Use a Hoop: A hoop helps to keep the fabric taut, ensuring that the stitches are even and consistent.
4. Use a Light Source: A lightbox or a window can help you see the design clearly, ensuring accuracy and precision.
5. Take Breaks: Embroidery can be time-consuming, so take breaks to avoid eye strain and maintain focus.
6. Experiment with Different Techniques: Don’t be afraid to try new stitches and techniques to add variety and depth to your design.
7. Embrace Your Personal Style: Let your creativity flow and create a Christmas tree that reflects your unique personality and style.
Conclusion: Embracing the Joy of Handcrafted Tradition
Embroidered Christmas trees offer a unique and meaningful way to celebrate the festive season. They allow for personalized expression, showcasing individual creativity and artistic talent. Each stitch represents a moment of joy and dedication, transforming a simple design into a cherished keepsake.
Whether it’s a classic triangular silhouette or a whimsical and detailed representation, the art of embroidering a Christmas tree invites us to embrace the warmth and joy of the holiday season, creating lasting memories through the magic of handcrafted artistry.


.jpg)
Closure
Thus, we hope this article has provided valuable insights into The Art of the Embroidered Christmas Tree: A Detailed Guide to Design and Technique. We thank you for taking the time to read this article. See you in our next article!