A Guide to DIY Christmas Nail Art Designs: Festive Flair at Your Fingertips
Related Articles: A Guide to DIY Christmas Nail Art Designs: Festive Flair at Your Fingertips
Introduction
In this auspicious occasion, we are delighted to delve into the intriguing topic related to A Guide to DIY Christmas Nail Art Designs: Festive Flair at Your Fingertips. Let’s weave interesting information and offer fresh perspectives to the readers.
Table of Content
A Guide to DIY Christmas Nail Art Designs: Festive Flair at Your Fingertips

The holiday season is a time for celebration, merriment, and, of course, festive decorations. And what better way to embrace the spirit of Christmas than with beautifully adorned nails? DIY Christmas nail art offers a delightful opportunity to express creativity, add a touch of personal flair, and celebrate the season in a unique and stylish way.
This guide delves into the world of DIY Christmas nail art, providing a comprehensive overview of techniques, designs, and inspiration to help you create stunning festive looks at home.
The Allure of DIY Christmas Nail Art
The appeal of DIY Christmas nail art lies in its versatility, affordability, and the joy of personal expression. It allows individuals to create personalized designs that reflect their unique style and festive preferences.
- Creative Expression: DIY nail art empowers individuals to unleash their artistic side and translate their holiday vision onto their fingertips.
- Cost-Effective: Compared to salon treatments, DIY nail art offers a significantly more budget-friendly approach to festive nail designs.
- Personalized Style: The freedom to choose colors, patterns, and embellishments allows for a highly customized and personalized look, making each nail art design truly unique.
- Festive Fun: Creating Christmas nail art can be a fun and relaxing activity, offering a creative outlet during the holiday season.
Essential Tools and Materials for DIY Christmas Nail Art
Before embarking on your festive nail art journey, ensure you have the necessary tools and materials at your disposal.
- Nail Polish: Choose a variety of colors and finishes, including reds, greens, golds, silvers, and white.
- Base Coat and Top Coat: These protect your nails and help the polish last longer.
- Nail Art Brushes: Invest in a set of fine brushes for intricate details and delicate lines.
- Dotting Tools: These come in various sizes and are ideal for creating dots, circles, and other patterns.
- Nail Art Stickers: These offer pre-designed patterns and motifs, simplifying the design process.
- Glitter: Add sparkle and shine to your designs with various glitter sizes and colors.
- Rhinestones and Sequins: These add a touch of glam and embellishment to your nail art.
- Nail Art Tape: This helps create clean lines and geometric designs.
- Q-tips and Acetone: For cleaning up any mistakes and removing excess polish.
Mastering the Basics: Essential Techniques for DIY Christmas Nail Art
While creating intricate nail art designs may seem daunting, mastering a few fundamental techniques forms the foundation for more elaborate creations.
- Freehand Painting: This technique involves using a brush to paint directly onto the nail, allowing for free-flowing designs and intricate details.
- Dotting: Using a dotting tool, create dots of varying sizes to form patterns, outlines, and embellishments.
- Stripes: Use nail art tape or a thin brush to create horizontal, vertical, or diagonal stripes.
- Negative Space: Leave portions of the nail bare, creating a contrasting effect and adding visual interest.
- Stamping: Use nail art stamping plates and a scraper to transfer intricate patterns onto your nails.
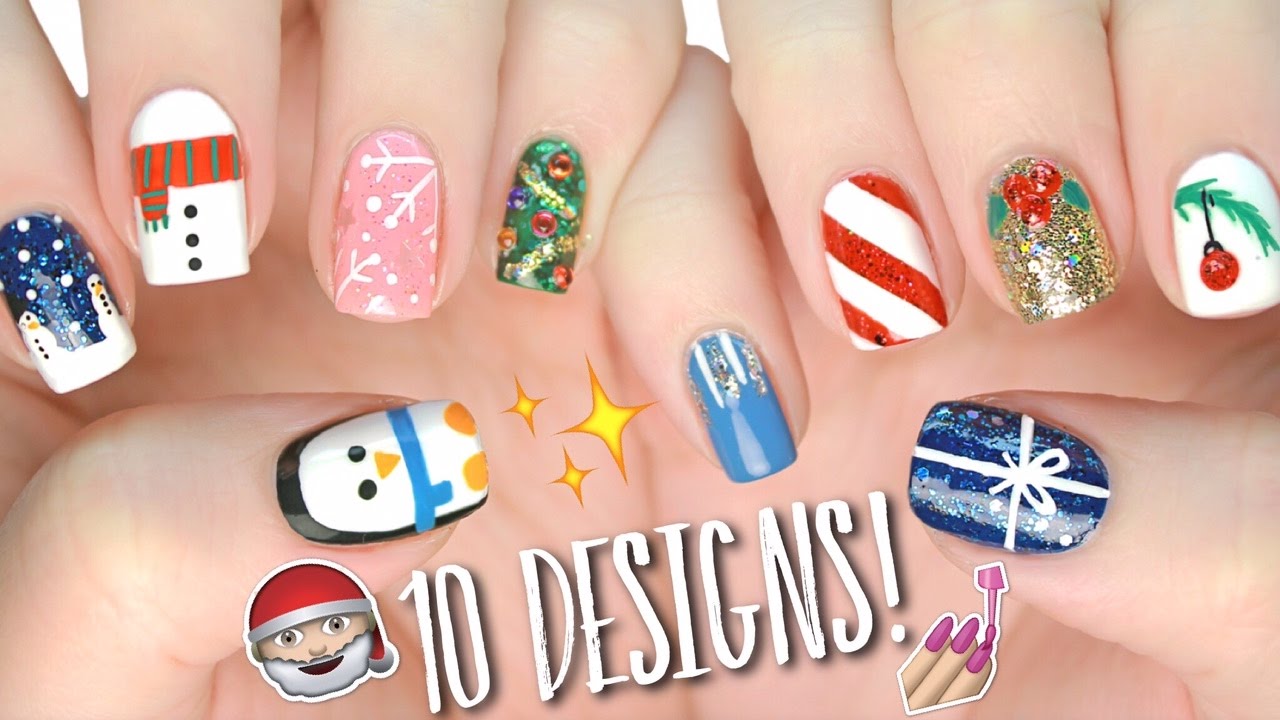
Inspiring Christmas Nail Art Designs: Ideas for Every Style
The possibilities for Christmas nail art designs are endless, catering to a wide range of styles and preferences. Here are some inspiring ideas to spark your creativity:
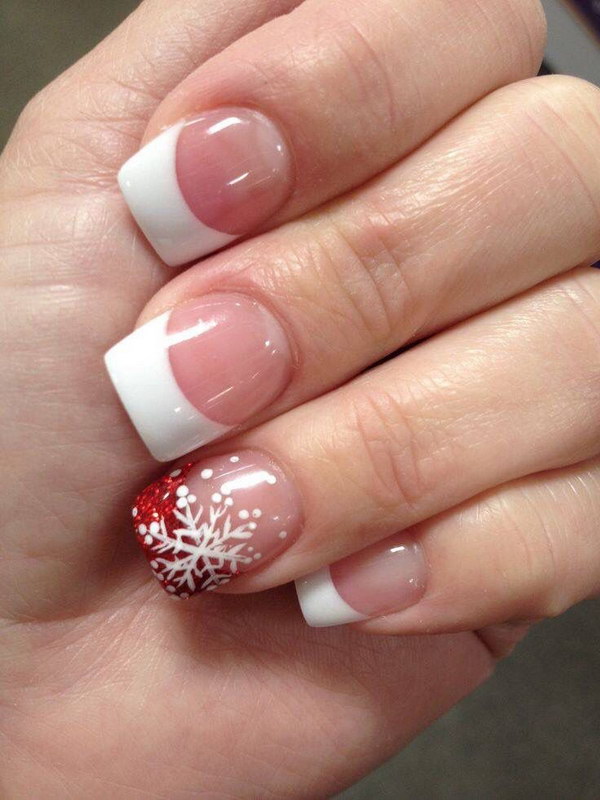
- Classic Christmas Colors: Embrace the traditional colors of Christmas with red, green, white, and gold. Create a simple red base with green snowflake accents or a green base with red glitter snowflakes.
- Winter Wonderland: Channel the beauty of winter with icy blue, silver, and white shades. Incorporate snowflakes, snowmen, or frosty trees for a whimsical touch.
- Festive Patterns: Experiment with classic Christmas patterns like plaid, stripes, or polka dots. Incorporate these patterns into your design or use them as accents on a solid base.
- Holiday Symbols: Celebrate the season with iconic Christmas symbols like reindeer, Santa Claus, Christmas trees, and ornaments. Use these elements as focal points on your nails or create a cohesive design with multiple symbols.
- Minimalist Chic: For a more understated look, opt for minimalist designs. Create a single accent nail with a delicate snowflake or a simple Christmas tree silhouette.
- Glitter and Glam: Add a touch of sparkle and glam with glitter, rhinestones, and sequins. Create a full glitter base or use these embellishments to accentuate specific designs.
Tips for Creating Stunning DIY Christmas Nail Art
- Prepare Your Nails: Start with clean and well-maintained nails. Use a base coat to protect your nails and ensure a smooth surface for the polish.
- Practice Makes Perfect: Practice your designs on a piece of paper or a nail art practice pad before applying them to your nails.
- Use Thin Coats: Apply thin coats of polish to prevent smudging and allow for even drying.
- Clean Up Mistakes: Use a Q-tip and acetone to clean up any mistakes or excess polish.
- Seal Your Design: Finish with a top coat to protect your nail art and make it last longer.
- Experiment and Have Fun: Don’t be afraid to experiment with different colors, patterns, and techniques. The most important thing is to have fun and create designs that you love.
Frequently Asked Questions About DIY Christmas Nail Art
Q: What is the best way to remove nail polish after creating Christmas nail art?
A: Use a cotton ball soaked in acetone-based nail polish remover. Gently rub the cotton ball over the nail until the polish is completely removed.
Q: How can I make my nail art last longer?
A: Applying a base coat before the polish and a top coat afterward helps to seal the design and protect it from chipping and fading.
Q: What are some tips for beginners?
A: Start with simple designs and gradually work your way up to more intricate ones. Practice on a piece of paper or a nail art practice pad before applying to your nails. Use thin coats of polish and clean up any mistakes with a Q-tip and acetone.
Q: What are some alternative ways to create Christmas nail art?
A: Nail art stickers, stamping plates, and nail art pens offer easy and convenient ways to create festive designs without the need for freehand painting.
Conclusion
DIY Christmas nail art provides a fun, creative, and personalized way to embrace the festive spirit. By mastering basic techniques, experimenting with different designs, and incorporating festive elements, you can create stunning and unique nail art that reflects your individual style and holiday cheer. So, gather your tools, embrace your creativity, and let your fingertips become a canvas for festive flair this Christmas.


Closure
Thus, we hope this article has provided valuable insights into A Guide to DIY Christmas Nail Art Designs: Festive Flair at Your Fingertips. We hope you find this article informative and beneficial. See you in our next article!