A Festive Guide to Easy Christmas Nail Art Designs
Related Articles: A Festive Guide to Easy Christmas Nail Art Designs
Introduction
With great pleasure, we will explore the intriguing topic related to A Festive Guide to Easy Christmas Nail Art Designs. Let’s weave interesting information and offer fresh perspectives to the readers.
Table of Content
A Festive Guide to Easy Christmas Nail Art Designs

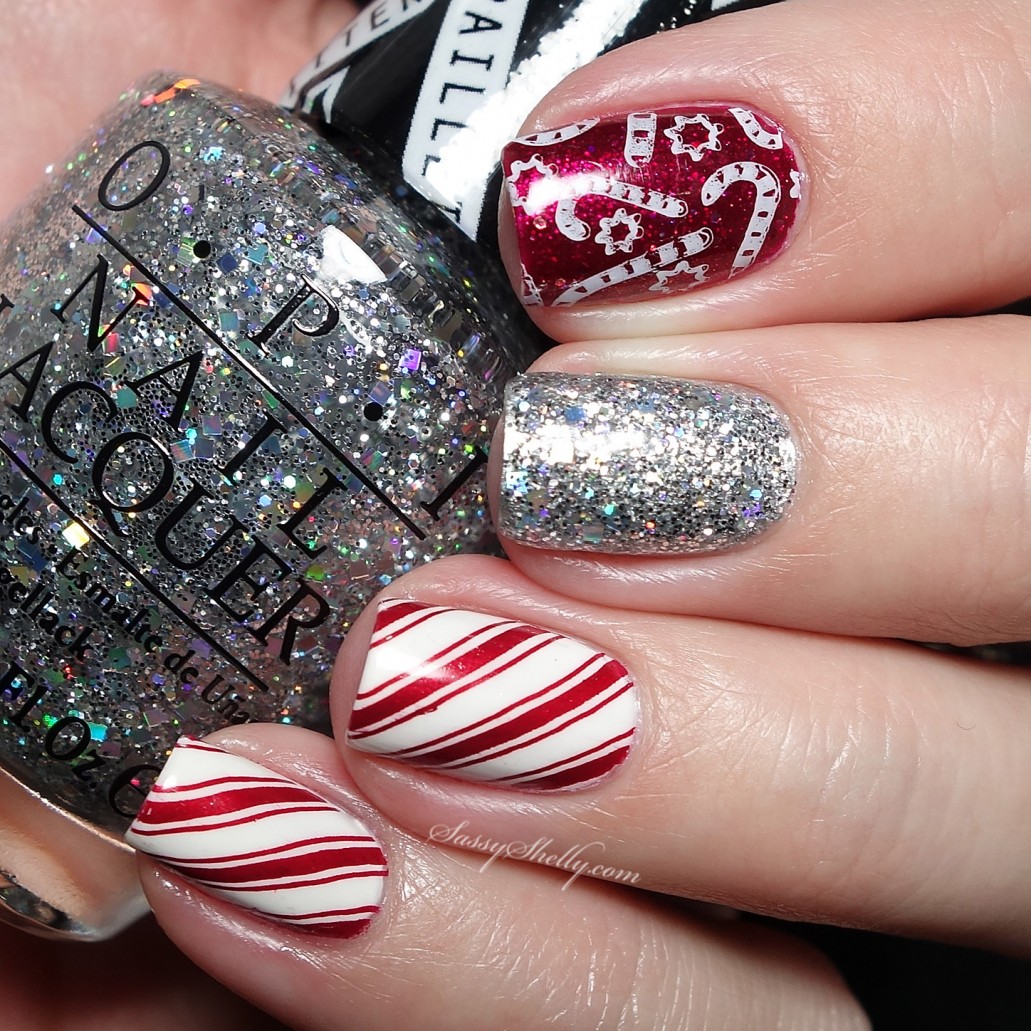
The holiday season is a time for celebration, joy, and of course, festive decorations. And what better way to embrace the spirit of Christmas than with a touch of festive cheer on your fingertips? Christmas nail art allows you to express your holiday spirit in a unique and personalized way.
This guide provides a comprehensive exploration of simple yet stunning Christmas nail art designs, offering step-by-step instructions and helpful tips to inspire your creativity. From classic snowflakes and reindeer to whimsical candy canes and sparkling ornaments, these designs are perfect for beginners and seasoned nail art enthusiasts alike.
Classic Christmas Nail Art Designs
1. Snowflake Nail Art:
- Step 1: Start with a clean, bare nail. Apply a base coat to protect your nails and ensure the polish adheres well.
- Step 2: Choose a base color for your snowflakes. White, silver, or blue are classic choices, but feel free to experiment with other colors.
- Step 3: Apply two coats of your chosen base color, allowing each coat to dry completely.
- Step 4: For the snowflakes, you can use nail art tools like a dotting tool, a toothpick, or a fine-tipped brush.
- Step 5: If using a dotting tool, dip the tip into a contrasting color and create small dots in a snowflake pattern.
- Step 6: If using a toothpick or brush, carefully draw thin lines to create the snowflake design.
- Step 7: Once the snowflake design is complete, allow it to dry thoroughly.
- Step 8: Finish with a top coat to seal the design and add shine.
2. Reindeer Nail Art:
- Step 1: Begin with a clean, bare nail and apply a base coat.
- Step 2: Choose a base color for your reindeer. A classic choice is brown, but you can use red, green, or even a glittery color for a fun twist.
- Step 3: Apply two coats of your chosen base color, allowing each coat to dry completely.
- Step 4: For the reindeer, use a dotting tool or a fine-tipped brush.
- Step 5: Using a contrasting color, create two dots for the eyes and a smaller dot for the nose.
- Step 6: Use a thin brush or toothpick to draw two antlers above the head.
- Step 7: Allow the design to dry completely before applying a top coat.
3. Christmas Tree Nail Art:
- Step 1: Begin with a clean, bare nail and apply a base coat.
- Step 2: Choose a base color for your Christmas tree. Green is the traditional choice, but you can also use blue, purple, or even a glittery color.
- Step 3: Apply two coats of your chosen base color, allowing each coat to dry completely.
- Step 4: Using a dotting tool or a fine-tipped brush, create a triangle shape at the bottom of your nail to form the base of the Christmas tree.
- Step 5: Use a contrasting color to add a star or ornament at the top of the tree.
- Step 6: Allow the design to dry completely before applying a top coat.
Whimsical Christmas Nail Art Designs
1. Candy Cane Nail Art:
- Step 1: Begin with a clean, bare nail and apply a base coat.
- Step 2: Choose a red base color for the candy cane.
- Step 3: Apply two coats of red, allowing each coat to dry completely.
- Step 4: Using a white nail polish or a white striping tape, create a diagonal line across the nail, starting from the bottom corner and extending towards the opposite top corner. This creates the candy cane swirl.
- Step 5: Allow the white line to dry completely.
- Step 6: Use a thin brush or toothpick to add small white dots or swirls to create a more defined candy cane pattern.
- Step 7: Finish with a top coat to seal the design.
2. Ornament Nail Art:
- Step 1: Begin with a clean, bare nail and apply a base coat.
- Step 2: Choose a base color for your ornament. Gold, silver, or red are classic choices.
- Step 3: Apply two coats of your chosen base color, allowing each coat to dry completely.
- Step 4: Using a dotting tool or a fine-tipped brush, create a small circle in the center of your nail to form the base of the ornament.
- Step 5: Use a contrasting color to add a small bow or a ribbon at the top of the ornament.
- Step 6: Allow the design to dry completely before applying a top coat.
3. Christmas Lights Nail Art:
- Step 1: Begin with a clean, bare nail and apply a base coat.
- Step 2: Choose a base color for your Christmas lights. Black or dark blue are good choices for a nighttime feel.
- Step 3: Apply two coats of your chosen base color, allowing each coat to dry completely.
- Step 4: Using a fine-tipped brush, draw small, thin lines across your nail to create the Christmas lights.
- Step 5: Use a dotting tool or a fine-tipped brush to add small colored dots to the lines, representing the light bulbs.
- Step 6: Allow the design to dry completely before applying a top coat.
Tips for Easy Christmas Nail Art Designs:
- Use a base coat: A base coat protects your nails and prevents the polish from staining them. It also helps the polish to adhere better and last longer.
- Apply thin coats: Thin coats of polish will dry faster and prevent smudging.
- Let each coat dry completely: Before applying a new coat of polish or adding a design, allow the previous coat to dry completely.
- Use a top coat: A top coat seals the design and adds shine. It also helps the polish to last longer.
- Practice makes perfect: If you’re new to nail art, don’t be afraid to experiment. Practice on a few spare nails before applying the design to your real nails.
- Use stencils: Stencils can be a great way to create intricate designs. You can find stencils at craft stores or online.
- Use a dotting tool: A dotting tool is a versatile tool that can be used to create dots, swirls, and other designs.
- Use a fine-tipped brush: A fine-tipped brush is great for creating detailed designs.
- Clean up mistakes: If you make a mistake, use a cotton swab dipped in nail polish remover to clean it up.
- Add some sparkle: Add some glitter or rhinestones to your designs for a touch of sparkle.
- Get creative: Don’t be afraid to experiment with different colors, designs, and techniques. There are endless possibilities for Christmas nail art!
FAQs about Easy Christmas Nail Art Designs
Q: What are the best nail polish colors for Christmas nail art?
A: The best nail polish colors for Christmas nail art are red, green, white, gold, silver, and blue. You can also use other festive colors like purple, pink, and brown.
Q: What are some easy Christmas nail art designs for beginners?
A: Some easy Christmas nail art designs for beginners include snowflakes, reindeer, Christmas trees, candy canes, and ornaments.
Q: What tools do I need for Christmas nail art?
A: You will need a few basic tools for Christmas nail art, including a base coat, top coat, nail polish remover, cotton swabs, a dotting tool, a fine-tipped brush, and a toothpick.
Q: How can I make my Christmas nail art last longer?
A: To make your Christmas nail art last longer, use a base coat, apply thin coats of polish, let each coat dry completely, and finish with a top coat. You can also try using a gel polish or a dip powder.
Q: Can I use nail art stickers for Christmas nail art?
A: Yes, you can use nail art stickers for Christmas nail art. They are a great way to add a festive touch to your nails without having to do any freehand painting.
Conclusion
Christmas nail art is a fun and festive way to express your holiday spirit. With a little creativity and practice, you can create beautiful and unique designs that will make you feel festive all season long.
Remember, the most important thing is to have fun and enjoy the process. Experiment with different colors, designs, and techniques to find what works best for you. And don’t be afraid to get creative and let your personality shine through!


Closure
Thus, we hope this article has provided valuable insights into A Festive Guide to Easy Christmas Nail Art Designs. We hope you find this article informative and beneficial. See you in our next article!